Yo, what’s up everyone! I’m here today to talk about how you can install a 6.35mm pitch connector. As someone who works with a 6.35mm pitch connector supplier, I’ve seen a lot of folks scratching their heads over this process. So, I thought I’d share some tips and walk you through it step by step. 6.35mm Pitch
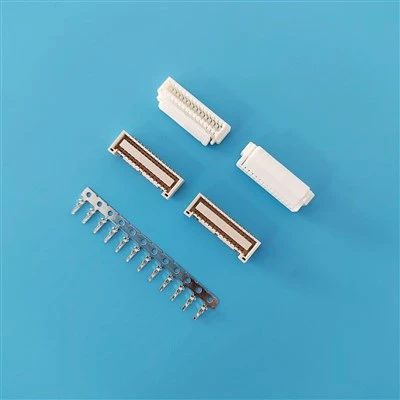
First off, let’s talk a bit about what a 6.35mm pitch connector is. The "6.35mm pitch" refers to the distance between the centers of adjacent pins or contacts on the connector. It’s a pretty common specification used in a bunch of different applications, like audio equipment, industrial machinery, and even some consumer electronics. These connectors are great because they’re reliable and can handle a decent amount of current, making them a popular choice for many projects.
Now, before you start the installation process, you need to gather all the necessary tools. You’ll need a soldering iron, some solder, a pair of wire strippers, and maybe a small pair of pliers. Make sure your soldering iron is in good working condition and that you have the right type of solder for the job. I usually recommend using a rosin-core solder because it helps with the soldering process and gives you a nice, clean joint.
The first step in installing a 6.35mm pitch connector is to prepare the wires. Take your wire strippers and carefully strip about 6 – 8mm of insulation from the end of each wire that you’re going to connect to the connector. Be careful not to nick the wire strands while you’re stripping the insulation. If you do, it can weaken the wire and cause problems later on.
Once your wires are stripped, it’s time to tin them. Tinning is the process of applying a thin layer of solder to the exposed wire strands. This makes it easier to solder the wires to the connector pins later. Heat up your soldering iron, and when it’s hot enough, touch the tip of the iron to the exposed wire. Then, touch the solder to the wire where the iron is touching. The solder should melt and flow evenly over the wire strands. Make sure to cover the entire exposed length of the wire with solder.
Now, let’s move on to the connector itself. Take a look at the connector and identify the pins where you’re going to connect the wires. Some connectors have markings or numbers on them to help you with this. If yours doesn’t, you might need to refer to the wiring diagram for your specific application.
Once you’ve identified the pins, it’s time to start soldering the wires. Heat up one of the pins on the connector with your soldering iron. When the pin is hot enough, touch the tinned end of the wire to the pin and then touch the solder to the joint between the wire and the pin. The solder should melt and flow around the wire and the pin, creating a strong electrical connection. Hold the wire in place until the solder cools and solidifies. Repeat this process for each wire that you need to connect to the connector.
After you’ve soldered all the wires to the connector, it’s a good idea to check your work. Make sure that all the solder joints are clean and shiny, and that there are no loose wires or solder bridges between the pins. A solder bridge is when a blob of solder connects two adjacent pins, which can cause a short circuit. If you see any solder bridges, you can use a soldering iron and a desoldering braid to remove the excess solder.
Once you’re satisfied with your soldering, you might want to add some strain relief to the wires. Strain relief helps prevent the wires from being pulled out of the connector due to normal wear and tear. You can use a piece of heat shrink tubing or some electrical tape to provide strain relief. Simply slide the heat shrink tubing over the wire where it enters the connector, and then use a heat gun to shrink the tubing. If you’re using electrical tape, wrap it around the wire and the connector in a tight spiral.
Another thing to keep in mind is that some 6.35mm pitch connectors come with a housing or a shell that you need to install. If this is the case for your connector, follow the manufacturer’s instructions for installing the housing. Usually, it involves sliding the connector into the housing and then securing it with screws or clips.
Now, I know that installing a 6.35mm pitch connector might seem a bit daunting at first, but with a little practice and the right tools, you’ll be able to do it like a pro. And if you run into any problems along the way, don’t hesitate to reach out for help.
As a 6.35mm pitch connector supplier, I can tell you that we have a wide range of connectors available to suit your needs. Whether you’re working on a small DIY project or a large industrial application, we’ve got you covered. Our connectors are made from high-quality materials and are tested to ensure reliability and performance.
If you’re in the market for 6.35mm pitch connectors, or if you have any questions about the installation process or the products we offer, I’d love to hear from you. Just get in touch with us, and we can start a conversation about how we can meet your requirements.

In conclusion, installing a 6.35mm pitch connector is a process that requires a bit of patience and some basic soldering skills. But by following the steps I’ve outlined here and using the right tools and materials, you’ll be able to install your connector successfully. And remember, if you need any help or if you’re looking for high-quality 6.35mm pitch connectors, don’t hesitate to contact us.
3.50mm Pitch References
- "Electronics Assembly and Troubleshooting Handbook", a general reference on electronics assembly techniques which helped in the description of soldering and wire preparation.
- Manufacturer’s datasheets for 6.35mm pitch connectors, which provided specific details about the connectors and their installation procedures.
Dongguan Yinglian Electronics Co., Ltd.
We’re well-known as one of the most professional 6.35mm pitch suppliers in China. With abundant experience, we warmly welcome you to buy bulk advanced 6.35mm pitch made in China here from our factory. If you have any enquiry about cooperation, please feel free to email us.
Address:
E-mail: James@csg-china.com
WebSite: https://www.csgconn.com/
