Hey there, I’m Jake—been in the 200-amp meter socket game for over 12 years, and most days, I’m on the phone with homeowners, electricians, and even fellow suppliers who’ve stumbled into a mess that makes replacing a meter socket feel way more intimidating than it should. Last month, a client told me he’d spent three weekends digging through YouTube tutorials, only to hit a dead end because his old socket had a weird grounding setup no video covered. That’s why I’m writing this—after years of shipping these sockets, training installers, and fixing mistakes, I’ve put together a step-by-step guide that’s actually grounded (pun very intended) in real, on-the-job experience. 200 Amp Meter Sockets
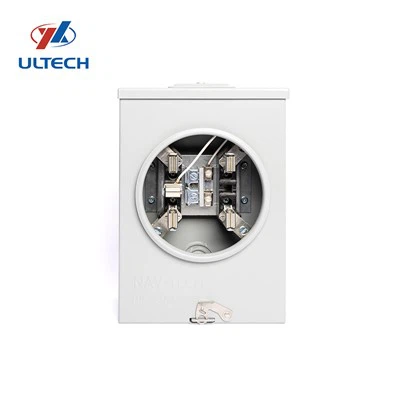
First off, let’s get one thing straight: 200-amp meter sockets aren’t like the little 100-amp ones that go in tiny vacation cabins. This is the workhorse that powers a 3,000-square-foot home, a shop, or even a small multi-unit building—handle this wrong, and you’re not just stuck without power. You’re looking at shock risks, fried appliances, or even code violations that’ll delay your electrical inspection for weeks. I always recommend hiring a licensed electrician for live-wire work, but if you’re a seasoned DIYer with experience working on 240-volt systems, this is the framework we use for our pre-purchase checks too.
Before you grab your screwdriver and start unscrewing, let’s talk prep—this is where 90% of mistakes happen. First, confirm your old socket is actually 200 amps. I can’t tell you how many times folks show up asking for a replacement, only to find their old socket is rated for 150 amps, which is a totally different part number. Check the nameplate on your existing meter socket—it’ll have a clear “200A” marking, plus a voltage rating of 120/240V, which is standard for most residential setups. If that number’s lower, or you’re upgrading from 100 to 200 amps (not just swapping a like-for-like), pause right there. You’ll also need to upgrade your main service entrance wire—for 200 amps, that’s 2/0 aluminum or 4/0 copper wire, and you’ll likely need a new main breaker too. I mention this because I’ve seen folks buy a $150 socket, skip the wire, and end up with a fire hazard.
Next, shut off every single possible power source—don’t just flip the main breaker in your house panel. Head outside to your meter socket’s disconnect, if you have one, and turn that off. Then, if your city allows it, call your local power company to come “pull the meter” for you. This is non-negotiable. The lines feeding your meter socket are still hot even if your home’s breaker is off—last year, a guy in Ohio ignored that step and got a nasty burn that kept him out of work for two weeks. Your power company will do this for free (most of the time; some charge a small fee, but it’s worth every penny) and won’t come after you for damaging your own equipment if you let them handle the hot line disconnection.
Once power is confirmed off (double-check with a non-contact voltage tester—hold it near every wire you’re about to work on; if it beeps, power’s still there), it’s time to remove the old socket. First, disconnect the load wires—these are the ones running from your home’s main panel to the meter socket. Label each wire with painter’s tape right now—mark “L1” for the black wire, “L2” for the red wire, and “neutral” for the white wire. I can’t stress how important labeling is. Last week, a licensed electrician I work with showed me a job where the previous DIYer didn’t label, and he spent two hours tracing each wire just to get power back on. Then, disconnect the line wires—these are the ones running from the power pole to your meter socket. Again, label these clearly; you’ll be reattaching them the same way.
Now, unmount the old socket from the wall. Most are held in place with four lag bolts, but some older models might have rusted screws that’ll snap if you force them. If that happens, don’t yank at the socket—use a hacksaw to cut the rusted bolt flush, then drill out the rest. Be careful not to damage the wood or vinyl siding behind it; scratches here mean extra work and maybe even siding repair down the line. Once the old socket is off, take a minute to inspect the wall opening. Is there rot? Are the old wires damaged? If you spot water damage around the hole, that’s a sign you might need to re-seal the opening once you mount the new socket, or even call a carpenter to fix the framing. This is another step DIYers skip, and within a year, their new socket is corroded from water seepage.
Now we get to the part that separates our supplier expertise from generic guides: prepping and mounting your new 200-amp meter socket. First, check that your new socket is the right fit. We send each socket with a template for marking the mounting holes—use that! Don’t guess at where the bolts go; even a half-inch off can mean you have to patch and re-drill the wall, which is a headache. Also, confirm the knockouts (the holes you use to run wires) line up with your existing service entrance. If you’re upgrading from a smaller socket, you might need a new knockout or to adjust the wire routing—our customer service team will walk you through this for free, no sales pressure, just to make sure you get the right part.
When mounting, use the lag bolts that come with your new socket—don’t reuse old rusted ones. Tighten them just enough to hold the socket securely, but don’t strip the bolts or the wall. If your socket has a grounding lug (which all 200-amp residential models do), you need to connect that to a grounded copper rod if you don’t already have a home grounding system. Wait—your old socket had a grounding wire, right? That’s the one you attached to your home’s ground rod or main panel. Reattach that now, and make sure the lug is tightened to at least 15 lb-in of torque—use a torque wrench if you have one; a loose ground connection is a major fire risk.
Now, the wire connections. This is where most people mix up L1 and L2, so go back to those labels you made earlier. First, attach the line wires (from the power pole) to the top terminals of the new socket. Tighten each terminal screw to the manufacturer’s specified torque—usually around 10 lb-in for aluminum wires and 15 lb-in for copper. Then, attach the load wires (going to your home panel) to the bottom terminals. The neutral wire connects to the neutral bar in the socket, not to the grounding bar—this is a critical NEC (National Electrical Code) rule. If you connect neutral to ground here, you’ll have stray voltage throughout your home, which can shock you when you touch a faucet or a light switch. This is one of the most common mistakes we see, and we always remind customers to double-check this step.
Once all wires are connected, do a quick visual inspection. Are all terminals tight? Is there any exposed wire? Is the grounding lug secure? Now, call your power company to come back out and re-install the meter. Once they’re done, you can flip your main home breaker on, then test a few lights and appliances to make sure power is flowing. If something isn’t working, don’t panic—turn the power off again and double-check your wire connections. It’s almost always a loose or misattached wire, not a major problem.
Wait a second—what if you’re upgrading your service, not just swapping a like-for-like socket? That’s a different ballgame, and I want to address that because we get a ton of requests for advice on upgrades. If you’re going from 100 to 200 amps, the steps above still apply, but you’ll need to pull a permit from your local building department first. No exceptions—inspectors will sign off on the work, and without a permit, you could have issues when you sell your home. You’ll also need to replace your main panel, since 100-amp panels can’t handle 200 amps. Again, this is where hiring a licensed electrician makes sense—we supply kits for 200-amp upgrades, but we always tell customers to bring an electrician in for full upgrades, not just the socket swap.
Now, let’s talk about common mistakes I’ve seen over the years, because knowing what to avoid is half the battle. First, skipping the non-contact voltage tester—even if you turned the power off, that old socket can hold a charge for a few minutes. Second, not labeling wires— I’ve had electricians tell me they spent 3 hours on a socket swap because the previous owner didn’t label wires. Third, reusing old wires—200-amp service needs thicker wire than 100-amp, and old wires might be frayed or corroded, which is a fire hazard. Fourth, not sealing the wall opening after mounting—water damage from an unsealed hole will ruin your new socket in a couple of years, so use silicone caulk around the edges (but not on the knockouts, you need those for wires) to keep moisture out. Fifth, forgetting the permit—we can’t stress this enough. A friend of mine had to tear out his entire new service last year because he skipped the permit, and the city made him redo all the work.
At the end of the day, replacing a 200-amp meter socket is doable, but it’s not a project to take lightly. If you’re not comfortable working with high-voltage systems, call a pro—most licensed electricians charge between $150 and $300 for this job, which is way less than the cost of a hospital stay or a home fire. For us, as a 200-amp meter socket supplier, our goal is to make this process easier for everyone—whether you’re a DIYer or an electrician. We stock all the standard models, plus heavy-duty options for mobile homes, commercial garages, and other specialty setups, and our team is always on hand to answer questions, send over installation guides, or help you confirm you’re ordering the right part for your home.

If you’re ready to order a socket, or just have more questions about the process, reach out to our team to connect and walk through your needs—we’re here to help you get the job done safely and correctly, no pressure, no hidden fees. Whether you need a basic residential socket, a bypass model for emergency use, or something for a custom project, we’ve got you covered, and we’ll make sure you have all the resources you need to get it installed right.
Din Rail Enclosures References:
- National Electrical Code (NEC) Article 230 (Service Entrances) and Article 312 (Switchboards, Switchgear, and Assemblies)
- Occupational Safety and Health Administration (OSHA) Electrical Safety Standards, 29 CFR 1910.303-1910.399
- Electrical Safety Foundation International (ESFI) Residential Service Upgrade Guidelines
- Our 2024 Installation Manual for 200-Amp Meter Sockets, Customer Training Documentation
Zhejiang Youtai Electrical Co., Ltd.
We are one of the most experienced 200 amp meter sockets manufacturers and suppliers in China. With a professional production team, we are able to meet the needs of the majority of our customers. Please rest assured to wholesale customized 200 amp meter sockets from our factory. Contact us for more cheap products.
Address: No.790, Nanming Rd., Shuige Industrial Zone, Lishui, Zhejiang, China
E-mail: sale@ultech.cc
WebSite: https://www.zhejiangyoutai.com/
